Controlling a PlayStation controller and adding more events, adding more features like threading, Start, Stop, Pause, Resume and more features.
Introduction
This is a threading-based and simple class with an example to replace the official "PlayStation 4 Controller" method. In most projects, the input is not the only thing that can stop everything until it get its value, run a task, then wait for another input or check for every button everytime you get values. Sometimes, you need to do tasks and get input at the same time. You can check the complete and latest version on GitHub. Input can be from several sources like Socket, Bt, IR, KeyBoard, Mouse, or Joystick at the same time. So it is not logic to make the input in the same thread you are working on. Also, values coming from the official class are just an array of numbers, while you may not know which value is for which Button. This is also solved by adding a named variable with value for each button (besides the array). I made the control easier by Threading, adding easier to understand values, and adding the ability to get more data to from the Controller.
There is no need for knowledge of multi-threading, PlayStation control, or game programming experience to use this code, it will run just inside your projects out of the box.
Simple Controller Explained
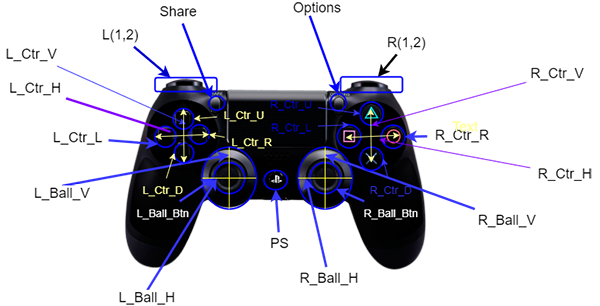
As shown in the picture, this is the PlayStation4 controller with Bluetooth, the default values coming from the Controller are arrays, you can also convert them to JSON data like this one
{0: False, 1: False, 2: False, 3: False, 4: True, 5: True, 6: True,
 7: True, 8: True, 9: False, 10: False, 11: False, 12: False}
What's New?
Threading Feature
First of all, SimplePS4Controller supports threading. It will work in a separated thread so you can work while getting and updating the values in realtime. It also supports:
start and stop
start function will start listening and getting data.
stop will terminate the thread and stop listening.
pause and resume
Pause will hold the listening for while.
resume will keep update again, and this is the difference between (stop/ start) and (pause/resume). Start and stop you can use it one time, but you can use (pause/resume) as much as you need.

Simple Names and Functions
Instead of gathering meaningless array, I enhanced this output to friendly named variables.
Adding more events.
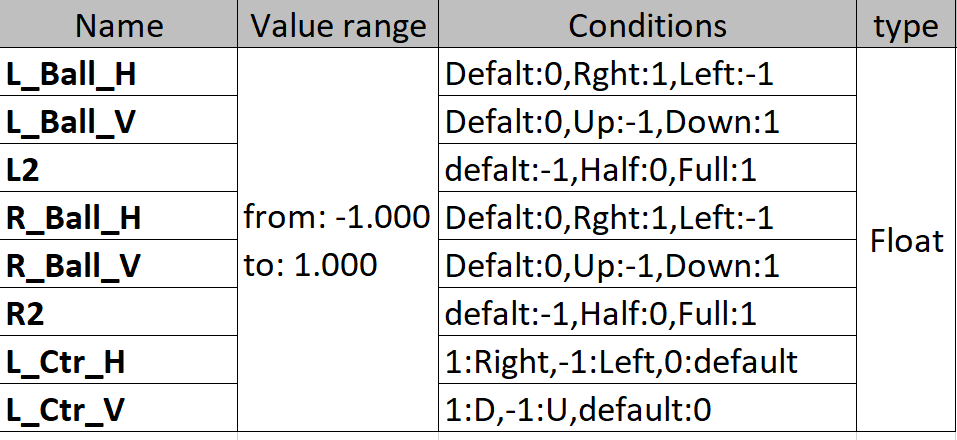
The values coming from the class are shown on the photo above. Values Names and types are listed in this Table:

This Table for float ranged data comming from the Controller:
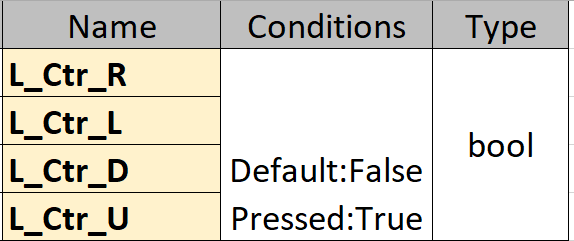
I added new values and events which are not presented as Events from the original Controller.
Table of New Values With Names
But you still can access the original data array using the following variables:
button_data
axis_data
More Features
Angle as 360°
I added more features like get the ball angle as 360° (not only -1 to 1 like the original data). This is an optional feature to decrease the computing time and effort to get angles instead of data numbers. It can specify which ball you would like to get value as angle (an example of which is in the using code section).
getAngle360(cx, cy, ex, ey)
New Data and Changed Data Flags
We use them to save your time for checking the data everytime when it maybe has not changed or you already read it before. So it is useless and wasting time to check everytime for data and compare it with the previous reading.
Both Flags are important and very useful if you need to take action only when data changed.
changed: This is a Flag means that the data is changed or not from the old reading.newData: This Flag you tell the controller that you already got it, you can set it to false and then wait until it becomes True again to take action for it. (Example in Using the Code)
Using the Code
Steps to Use Simple PS4Controller
- First, you should create an object from the class
SimplePS4Controller - Start
SimplePS4Controller to start listening to PlayStation Controller events by calling start
Done. :)
Run demo.py from the attached files, or get the latest version from GitHub.
Here is an example:
ps4 = SimplePS4Controller()
ps4.start()
print("listener started ")
After you finish using controller, when you want to exit your program, just call stop method.
ps4.stop()
To get data coming from Controller, you will use a class named ControllerData .This class stores Controller data like changed, newData, variable names in the above Tables, and methods like: getAngle360, printSimplifiedValues
Getting Data While Working
Here is an example of getting and using data coming from Controller while you are doing another actions:
This example will print the data as array , and as variables in Tables above by order.
i=10000
while(i>0):
time.sleep(0.1)
print "Axis Data"
print ControllerData.axis_data
print "Buttons Data"
print ControllerData.button_data
print ("Simplified Data")
ControllerData.printSimplifiedValues()
i = i-1
getAngle360 Example
x = ControllerData.axis_data[0]
y = (ControllerData.axis_data[1]*-1)
angle = ControllerData.getAngle360(0,0,ControllerData.L_Ball_H,ControllerData.L_Ball_V)
print ("Angle : "+str(angle))
changed and newData
Here is an example for using changed, newData. Actually in the program, we only use newData because changed is set automatically by the SimplePS4Controller class.

if ControllerData.newData:
.....
.....
ControllerData.newData = False
Source Code
Code Tips and Tricks
This paragraph is to show how I made it, not to use it as a user.
Reading data from PlayStation4 Controller(joystick):
for event in pygame.event.get():
ControllerData.changed=True
ControllerData.newData=True
if event.type == pygame.JOYAXISMOTION:
self.axis_data[event.axis] = round(event.value,2)
elif event.type == pygame.JOYBUTTONDOWN:
self.button_data[event.button] = True
elif event.type == pygame.JOYBUTTONUP:
self.button_data[event.button] = False
Setting data to ControllerData:
ControllerData.button_data=self.button_data
ControllerData.axis_data = self.axis_data
ControllerData.simplfyData()
Basic Principles
Resources used for this class and code: Python game module pygame.
And it should be installed before using the code. You can install it using pip.
pip install pygamme
pip3 install pygame
Code also used Joystick module:
pygame.joystick
Conclusion and Points of Interest
Using this class, you can catch input from Controller and work at the same time. In addition, you can get data as array, also as friendly names.
History
- 23rd July, 2020: Initial version


